Today’s project is a Half Scale Kitchen Work Table that you can make out of medium weight chipboard. It’s very simple to make and uses only chipboard, paint, an alcohol ink marker and tiny bead.
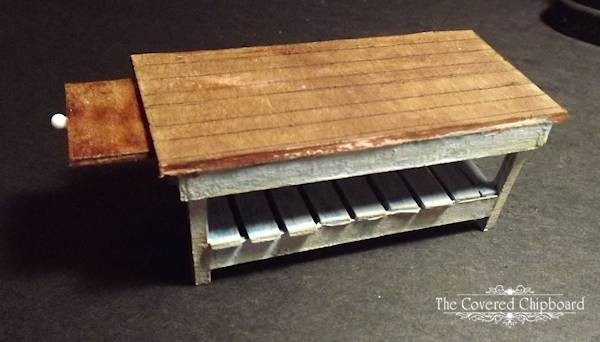
Finished project measures: 1-1/2″ wide by 4″ long by 1-1/2″ tall
Materials needed . . .
- medium weight chipboard
- acrylic paint – I’ve used a med blue base with white dry brushed over top
- brown alcohol ink marker or brown paint
- small piece of sand paper if using brown paint
- tiny white bead or bead head off pin
- Aleenes quick dry tacky glue
- black fine point ink pin or sharp pencil
Couple notes . . . If you look at the top you can see a couple of spots that look like bad spots. These happened by accident, I got white paint on the top before I colored it with the marker. Turned out great because that just added to the aged look of the piece so . . . you might want to smudge a little white paint (very thin layer) in a few spots, before coloring the top, to get this same look! I did not measure the small boards on the bottom, some are a little longer than others and the last board is half the width of the others. Again, this just added to the home-made aged overall look. Lastly, this piece is for a half scale house. If your house is larger or smaller, just double or half my measurements as needed.
Cut from the chipboard . . .
- Top: 1-11/16″ by 3-5/16″ (If you want a thicker top, cut two this size and glue together)
- Top rails: (2) 1/4″ by 3-1/16″
- Top rails: (2) 1/4″ by 1-5/8″
- Pull out drawer: 1″ by 3/4″
- Legs: (8) 1/8″ by 1-1/4″
- Bottom rails: (2) 1/4″ by 2-11/16″
- **Bottom slats: (8) 1/4″ by 1-1/2″ (measure the area these lay on when you get to that point as there might be a 16th” difference depending on how straight you got your legs glued on!)
Hopefully the pics below give you a better view on how the table is put together
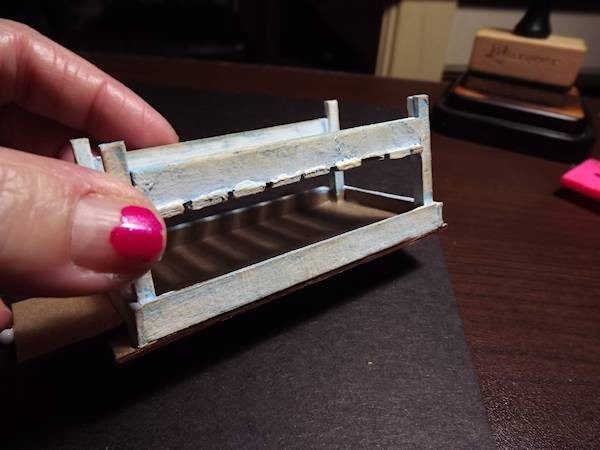
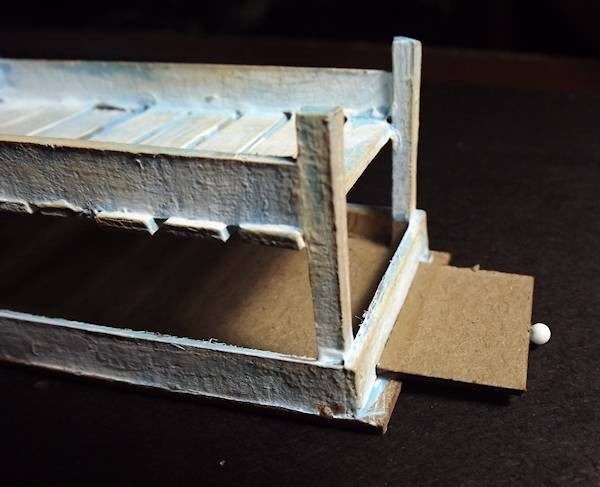
Make 4 table legs – glue two leg pieces together, back to back, to form one single leg. Set these aside for now.
Glue the top rails onto the table top with the shorter pieces overlapping the ends of the longer pieces (see the image directly above) let dry.
Work on one set of legs, on the longest side, at a time. Glue a leg in the inside corner and a second leg on the opposite corner, on the longest side, making sure they are straight up. Attach the bottom rails between the two legs on the longest side now, to help the legs stay straight, and hold while drying. Repeat for the opposite long side. Let dry completely.
Now glue on all the bottom slat pieces and let dry completely. You will find that it doesn’t take very long for the glue to dry on chipboard!
Paint all but the top of the table in whatever under color you want then when dry, dry brush as much white paint as you like on top of the other color. Once dry, to further age the piece, I’ve rubbed on some Vintage Photo distress ink, here and there.
If you have never used distress ink, it’s very easy to apply with THIS tool
Color the table top and pull out drawer parts with the alcohol marker or paint. If using paint, I suggest watering down the paint and brushing on a light coat. The chipboard is a brown color and will darken up whatever color ink or paint you might use so go with a light coat at first and add to it if needed.
Use a black ink pen with a ruler and draw lines on the table top so that it looks as if it were made with a lot of smaller boards instead of one large piece. NOTE: If you wanted the top to actually be a lot of smaller boards, you could cut these out and glue them to the solid larger top piece.
Lastly, I went back and added dots with an ink pen to look like nails in the boards on top.
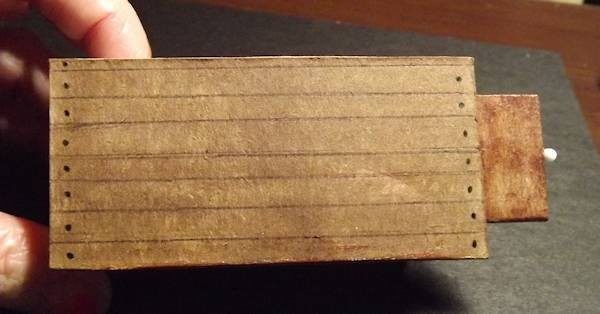
When your table is finished, spray the entire piece with a clear matte or semi-gloss spray sealer. I use one found at our local discount store made by Krylon.
Once you have the table made, you could actually add to it by creating a hutch type upper portion, place the table against the wall with the hutch on top of it for a nice cupboard! I’ll do one of those soon and add another tut for it.
Have fun!



Leave a Reply
You must be logged in to post a comment.