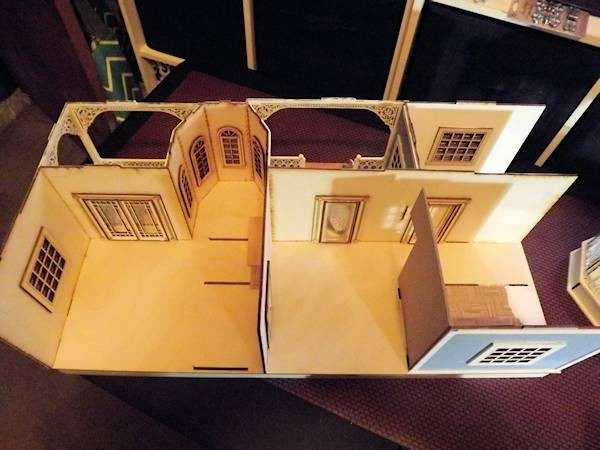
And now for a look at the finished rooms, but first a look at the final layout of the house and the modifications I made . . .
In the kitchen, entry areas, to the right side, I removed two wood walls and constructed a new wall with a double thickness of chipboard. I needed the doorway to be on the other end and the wall to be long enough for my kitchen sink furniture piece to fit on. For this door opening and the one to the left, entry into the living room, I removed the doors and used only the door frames.
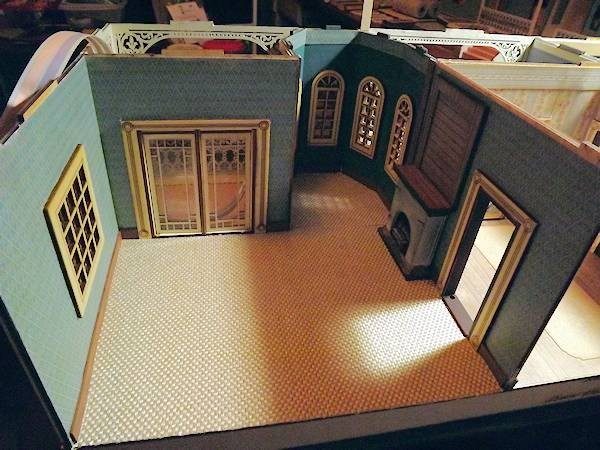
Living room . . . all of my wallpapers were created by scanning 6×6 scrapbook papers into my computer, sizing them and then printing them on 110 lb white matte cardstock. Papers were spray sealed with a clear matte spray sealer right after being printed. What was nice about this was the paper is thicker than store bought dollhouse paper, less expensive, and easier to apply to the walls because I was able to use 1/4″ score tape to apply the paper! This also makes it easier to remove a paper, if needed, to repair any tape wire run. Score tape was added around the door or window opening and around outside edges of the paper for application.
Carpeting was a piece of 12×12 woven textured scrapbook paper also applied with score tape.
I painted the bay window area walls and added a paper border around the top.
The base boards were cut from 1/4″ tall medium weight chipboard strips, applied with Aileens tacky glue.
The chipboard is a natural or craft color that I colored with a Spectrum Noir Alchohol Ink pen: EB3 color. These markers work great on the chipboard, you can get the color you want, and just spray seal them afterwards for protection.
**When you apply the paper, remove one of the score tape backing from either the top, bottom or side first, apply the paper to get it straight, then remove the other tape backings and press down the rest of the paper. Working with only one tape backing removed at the start, keeps the other areas from sticking while you are trying to get the paper straight.
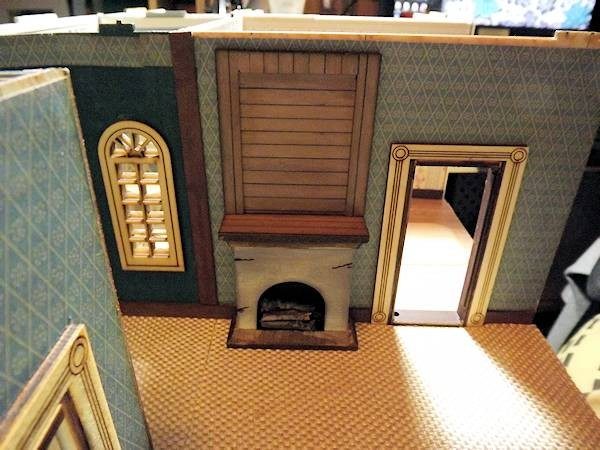
Close up of the fireplace: found at Michaels craft store, $1.50 on sale for a simple wood fireplace. I used chipboard to add the back wall/top of fireplace and covered it with printed wood plank paper. I stained the top and bottom of the fireplace with Vintage Photo distressing ink, painted the inside with black acrylic paint and added some broken up sticks inside the fireplace for wood. The front and main area of the fireplace was painted with white acrylic paint then distressed with Black Soot distressing ink. A clear matte spray sealer was used to finish the entire fireplace. I’ve glued the fireplace in place as it won’t be moved around.
Entry area . . . I’ve used the blue stripe in the paper to make a border at the top of the walls, using a larger sized paper than was used on the walls. That’s the great thing about using your own printed paper . . . you can adjust the pattern size as needed! The baseboards were chipboard, painted with acrylic paint. I actually did these base boards before trying the marker to color the chipboard. I may go back and change these to match the ones in the living room? Still thinking about it. Normally your base boards will be the same color thru the entire house but . . . it’s my house so I can do anything I want right!
TIP: hindsight . . . I think I would use the score tape to attach the base boards instead of the glue. That way it would be easier to change it if needed. Once glued, it’s very difficult to remove the chipboard without leaving a layer behind on the wall.

Kitchen and Library . . .
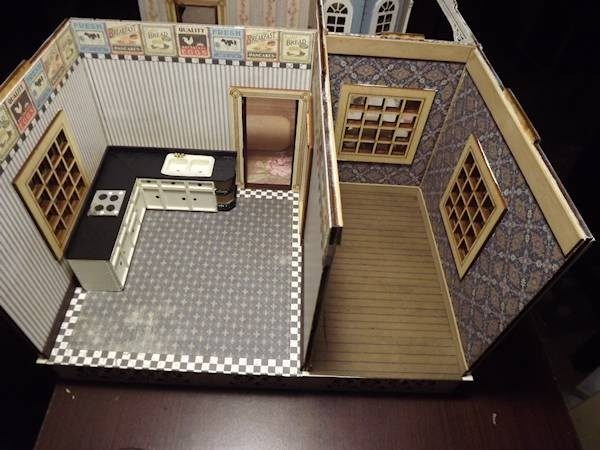
Now you can see why I needed the kitchen wall longer and the door on the opposite end of the wall. I’ve listed where I got the kitchen set kit in another post. I bought it and built it before I finished the kitchen so I could see what room it would fit in. I found it very hard to find a decent looking kitchen set in the 1:24th scale and this one was the best one I found. At first I wasn’t crazy about using a kit I had to build BUT once I got started on it, I had a lot of fun making it and because it was a kit, was able to paint it the colors I wanted. I’ve now purchased a lot of furniture kits and am waiting for them to be delivered.
One thing I found in this process is that Dollhouses and miniatures in general are a lot more popular in the UK than in the US so be prepared, if not making the furniture yourself, you will most likely have to order it all online and from outside the US. Most places are good about discounts and free shipping for $ specific order amounts. I will be creating several furniture pieces along the way and will be offering the patterns in the store in case you are interested!
The kitchen papers are a mix of dollhouse wallpaper and printed papers. Both the border and black and white check patterns are on the same roll of dollhouse paper I found on sale for .75 cents. The stripe is a scanned and printed scrapbook paper and the blue patterned paper on floor center is a piece of 6×6 scrapbook paper used right from the paper pad. Baseboards are the same as what I used in the entryway.
The library, on the right, I wanted a bit darker, more masculine in finishes. The paper on the walls is scanned and printed scrapbook paper. The flooring is a digital wood paper I created and printed. The baseboards were painted with a very light brownish gold color and then distressed with Vintage Photo distressing ink.
When trying to fix the front porch flooring papers, changing to another color after they were attached, I was able to brush on a coat of natural minwax stain and get a bit of a glossy finish! Just don’t make the coat to thick when you paint it on the first time and add layers if you want more shine, allowing each coat/layer to dry before adding another. I’ll be doing this on the flooring in both the entry and library.
A few final thoughts . . .
- “Measure twice and cut once” for everything you do!!! It’s nice using my own printed paper because I always had more paper in case of an accident when cuting!
- Baseboards and molding can be created with strips of medium weight chipboard, found on Amazon.com and can be stained with markers or painted.
- Spray seal all printed papers and stained chipboard before using for protection.
- Don’t be afraid to modify the origianal dollhouse walls or layout to suit your own needs or taste! The medium weight chipboard in double thickness makes great walls.


Leave a Reply
You must be logged in to post a comment.